GitHub Management Policy
GitHub Management Policy
This document provides instructions on how to use GitHub as a Company team member.
As a team member who wants to contribute to your team’s project, the following steps should be followed to get your code or markdown document published to the main branch of your products repository.
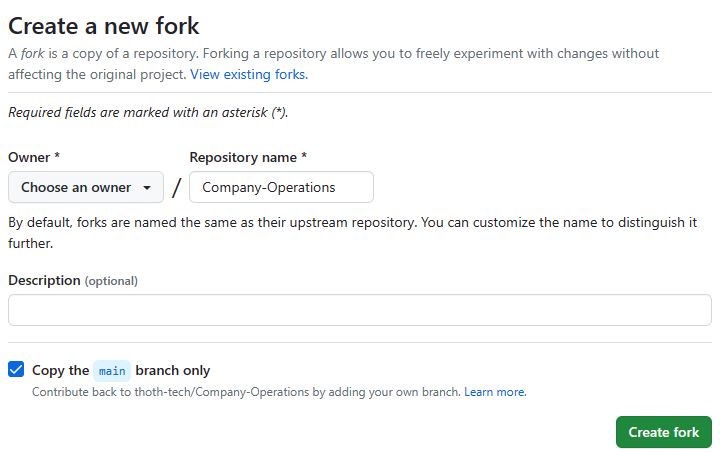
Step 1: Fork the Main Branch of your Products Repository
-
Navigate to the repository that you want to fork and locate Fork on the top right corner of the page.

-
Click on Fork and you would be required to Choose an owner. This is usually your personal GitHub account, add a description if you wish and Create Fork.
-
Once the Fork is completed, you should now see it as a repository in your personal GitHub account or whatever account you chose as the owner.
-
While on the Forked repo, clone it and perform the updates you wish to.
I forked from the wrong repo; how do I change it?
If you forked from the wrong repo and you haven’t made any commits, then the easiest option is to start over. If you have made commits you will need to change the fork location like this…
-
Fork the correct repo (the Company one) via the GitHub web interface
-
Navigate to the your local repo’s root directory in terminal
-
Rename your origin to upstream
git remote rename origin upstream
-
Add the new fork as the origin
git remote add origin git@github.com/[GITHUB_USERNAME]/[YOUR_NEW_FORK_NAME]
-
Fetch from new origin
git fetch origin
-
Set origin master
git branch —set-upstream-to origin/master master
-
Push to fork
git push origin
… Done!
Your changes should now be going to the right place.
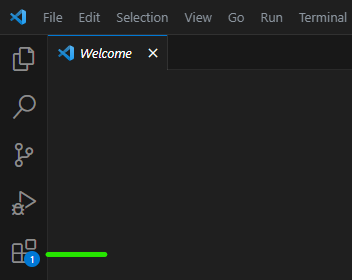
Step 2: Install Prettier, Vale, and Markdown Lint on VS Code
After you have forked the repository and cloned it to begin work on your local system via VS Code, you would need to set up the required spell checkers and code formatters to ensure compatibility during code build. To achieve this, do the following.
-
Locate and Click the Extensions icon on the navigation bar (usually located at the left side of your screen).
-
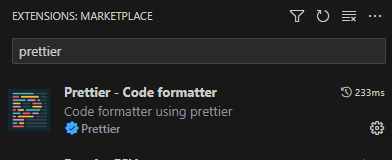
Search for Prettier and follow the prompts to install it.
-
Follow the same process to search for and install Vale and Markdownlint.
-
Navigate back to your terminal. To ensure that all the required modules is available on the copy of the cloned repo, run “npm install” on the terminal.
-
To configure Prettier, run “npm install prettier.”
-
To ensure the document is well formatted after creation, right click on your document and select “Format Document with”, then select “markdownlint”, then right click the document again and Format Document with “Prettier.”
Step 3: Format your Code
For a markdown document, the tools installed above would be used for this purpose. Once you are done writing your document, follow these steps to prevent a failed check in GitHub.
- On your document, right click and select “Format document with” and select markdwonlint.
- Then right click again, select “Format document with” and select Prettier.
- On your terminal run npm run format.
Step 4: Create a Commit
-
On VS Code, locate the commit icon on the left navigation bar, type in a Commit message (you can adopt Chris beam’s guide to create a good commit message), and commit the changes.
![git tut]/Starlight-Documentation-Website(/git-tut-5.png)
Step 5: Create a Pull Request
-
On GitHub, navigate to the main page of the repository.
-
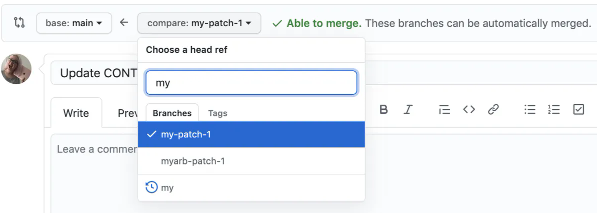
In the “Branch” menu, choose the branch that contains your commits.
-
Above the list of files, in the yellow banner, click Compare & pull request to create a pull request for the associated branch.
-
Use the base branch dropdown menu to select the branch you’d like to merge your changes into, then use the compare branch drop-down menu to choose the topic branch you made your changes in.
-
Type a title and description for your pull request.
-
To create a pull request that is ready for review, click Create Pull Request. To create a draft pull request, use the drop-down and select Create Draft Pull Request, then click Draft Pull Request.
-
After your pull request has been reviewed and approved, it can be merged into the repository.
Code Review Guidelines
You are strongly encouraged to get your code reviewed by a reviewer as soon as there is any code to review, to get a second opinion on the chosen solution and implementation, and an extra pair of eyes looking for bugs, logic problems, or uncovered edge cases.
Draft Pull Request
Draft Pull Requests allow a work in progress to receive early feedback. The developer creating the PR should, in the description, indicate their progress and any particular aspect they are looking for feedback on. When the PR is ready for final review, the developer should update the description, re-request reviews as required and change the status to “ready to review”.
Pull requests (draft and otherwise) are created from the GitHub website.
Required Approvals
Pull requests require a minimum of two approvals. The default approach is to choose a reviewer from your team for the first review. However, the reviewer may be from different team, for example a domain expert in a programming language, quality assurance process, telemetry or documentation. Depending on the team size and dynamics, the number of required approvals can be higher or lower.
Collaborate on an existing branch
Ideally, we should avoid having developers working on the same code. It creates merge conflicts and hinders efficiency. If possible, try to break it down into small tasks so developers can work independently. In the worst-case scenario, if there is more than 1 person working on a feature branch:
-
Please make sure you pull changes in the remote branch before starting your work.
git pull origin feature/remote branch name
-
Resolve any merge conflicts that may now be revealed. Please avoid force-push and rebase when working on a shared branch. It can cause complex and hard to resolve merge conflicts as wellas undo others’ commits accidentally.